check out the new remote control Jockey Wheel SmartBar Canegrowers rearview170 Cobb Grill Skid Row Recovery Gear
Members Login
Username 
 
Password 
    Remember Me  
Post Info TOPIC: Solar regulator holes not large enough for correct size wire!!!!!!!!!!!


Guru

Status: Offline
Posts: 5679
Date:
Solar regulator holes not large enough for correct size wire!!!!!!!!!!!


How do people connect the suitable wire, like 6B&S, to controller? Also why are the controller screws flat rather than phillips?

Aussie Paul smile


__________________


Guru

Status: Offline
Posts: 7314
Date:

Audiophiles like to use extremely heavy gauge speaker wire & use gold plated pin lugs on the end. This is a pretty poor example!

IMG_20200627_172902324~2.jpg


Attachments
__________________

Procrastination, mankind's greatest labour saving device!

50L custom fuel rack 6x20W 100/20mppt 4x26Ah gel 28L super insulated fridge TPMS 3 ARB compressors heatsink fan cooled 4L tank aftercooler Air/water OCD cleaning 4 stage car acoustic insulation.


Guru

Status: Offline
Posts: 4375
Date:

Trim a few strands of copper from the end of the cable until it just fits.
Ideally crimp on a "boot lace" that fits the controller to the end of the cable. Don't solder.
Cheers,
Peter

__________________

OKA196, 4x4 'C' Class, DIY, self contained motorhome. 960W of solar, 400Ah of AGMs, 310L water, 280L fuel. https://www.oka4wd.com/forum/members-vehicles-public/569-oka196-xt-motorhome


Guru

Status: Offline
Posts: 7314
Date:

The other option is a short section of wire to a terminal block & then the larger wire.


__________________

Procrastination, mankind's greatest labour saving device!

50L custom fuel rack 6x20W 100/20mppt 4x26Ah gel 28L super insulated fridge TPMS 3 ARB compressors heatsink fan cooled 4L tank aftercooler Air/water OCD cleaning 4 stage car acoustic insulation.


Guru

Status: Offline
Posts: 4375
Date:

Whenarewethere wrote:

The other option is a short section of wire to a terminal block & then the larger wire.


 I would advise against that solution if there is any other alternative (and there are several).

The speaker style reducers that Whenarewethere posted are a much better solution, but they need to be properly crimped and not soldered.

Most electrical problems come from connections. That takes the number of connections for 2 cables from 2 to 6 and increases the future potential problems proportionately.

Cheers,

Peter 


-- Edited by Peter_n_Margaret on Saturday 27th of June 2020 05:50:38 PM

__________________

OKA196, 4x4 'C' Class, DIY, self contained motorhome. 960W of solar, 400Ah of AGMs, 310L water, 280L fuel. https://www.oka4wd.com/forum/members-vehicles-public/569-oka196-xt-motorhome


Guru

Status: Offline
Posts: 4586
Date:

Why do you advise against soldering?


__________________

See Ya ... Cupie


Guru

Status: Offline
Posts: 4375
Date:

Solder hardens the copper and makes it more liable to fatigue failures (broken wires), so maybe OK to join 2 wires, but bad for terminations like we are talking about because one part is fixed solid but the cable can still vibrate due to road surfaces. You never see a soldered wire in an aircraft or a car where all joints are crimped.
Might be OK in a loud speaker at home.
The other issue you can actually see in the pics put up by Whenarewethere. There is a touch of green inside the clear insulation. That is probably copper oxide (corrosion) caused by the acidic solder flux. This can also cause long term problems.
The third reason is that solder creeps (moves) when subjected to constant pressure. That means that a soldered wire that is then crimped or clamped into a screw terminal can often come loose over time. If you insist on soldering a crimp connection like the pic, crimp the wires first and solder afterwards, not the other way around.
Better to use a proper crimping tool and not solder at all (the crimps in the pic are very poor and not done with a crimping tool).
Cheers,
Peter


-- Edited by Peter_n_Margaret on Saturday 27th of June 2020 07:32:23 PM

__________________

OKA196, 4x4 'C' Class, DIY, self contained motorhome. 960W of solar, 400Ah of AGMs, 310L water, 280L fuel. https://www.oka4wd.com/forum/members-vehicles-public/569-oka196-xt-motorhome


Guru

Status: Offline
Posts: 7314
Date:

They are soldered on the speaker cones, my Wharfedale E50 speakers have been going most days for 35 years. Outlasted 2 amplifiers!


__________________

Procrastination, mankind's greatest labour saving device!

50L custom fuel rack 6x20W 100/20mppt 4x26Ah gel 28L super insulated fridge TPMS 3 ARB compressors heatsink fan cooled 4L tank aftercooler Air/water OCD cleaning 4 stage car acoustic insulation.


Senior Member

Status: Offline
Posts: 430
Date:

My first question would be why are you using 6 B&S wire? How many panels do you have, and can you wire them in series instead of parallel to avoid the need for such large gauge wire?

And to answer your question about Philips, they were specifically designed for machine assembly to locate the screw faster, and to 'slip' out before being overtightened by a dumb machine. For manual tightening the slotted design is actually better and allows greater torque to be applied. Pozidriv is the best system as it combines the best of both designs, and is used for the screws on electrical circuit breakers.

__________________


Guru

Status: Offline
Posts: 7314
Date:

I'm using 6awg for my 120 watt setup, but I'm trying to get blood out of a stone!


__________________

Procrastination, mankind's greatest labour saving device!

50L custom fuel rack 6x20W 100/20mppt 4x26Ah gel 28L super insulated fridge TPMS 3 ARB compressors heatsink fan cooled 4L tank aftercooler Air/water OCD cleaning 4 stage car acoustic insulation.


Senior Member

Status: Offline
Posts: 430
Date:

Whenarewethere wrote:

I'm using 6awg for my 120 watt setup, but I'm trying to get blood out of a stone!


Single 12V nominal panel at 120W? Only reason to go up in wire size is to reduce losses due to volt drop, but in a system of that size the difference between say 6mm2 wiring and 16mm2 (6AWG) would be negligible. Taking a worked example - assume length of circuit is ten metres then using 6mm2 wiring the volt drop would be 0.57V, whereas keeping everything else constant and upgrading to 16mm2 the volt drop would be reduced to 0.21V, which equates to a saving of only 3.6W or 3% of your max output. If your objective is to maximise the output of your system you'd get better results washing the panel regularly or orientating it more accurately to the sun. If you have multiple panels, as volt drop is proportional to current but not voltage, wiring them in series will halve your losses (for two panels), if your solar controller can handle the increased voltage.


__________________


Guru

Status: Offline
Posts: 1927
Date:

aussie_paul wrote:

How do people connect the suitable wire, like 6B&S, to controller? Also why are the controller screws flat rather than phillips?

Aussie Paul smile


 Hi Paul smile

Some controllers do have minimal sized holes in their terminals. confuse 
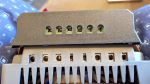
If you want to use generous sized wire, which is always a good idea and costs very little extra, then when you strip the insulation off just reduce the number of wires with a cutter till they will fit into the terminal. I find this is the easiest way and does not involve extra work crimping 'bootlace' terminals or soldering etc and there is nothing extra to go wrong either. 

Because the wires are all twisted together in the insulation and make contact, they all carry the current over the length of the run, there is no noticeable loss just reducing the area a bit at the connections only. A good connection is essential for low losses. On another note I usually buy marine wire as it is tinned copper and resists the 'green' corrosion over time much better and if you want to solder it makes the solder flow on the wire even easier.  aww

Hi Mamil smile

using 6mm2 wiring the volt drop would be 0.57V, whereas keeping everything else constant and upgrading to 16mm2 the volt drop would be reduced to 0.21V, which equates to a saving of only 3.6W or 3% of your max output." 

Well what you say is true, but the voltage loss of 0.36V actually can make quite a difference to the charging of a battery. However it is still a voltage drop which is a total loss and does no good at all so minimise it if possible. If the overall voltage dropped from 15 down to 12 this is 20% down but the battery charging stops and it is 100% lost.  Clean the panels too and arrange the panels in the best configeration only if you have a MPPT unit.  

Jaahn  


-- Edited by Jaahn on Sunday 28th of June 2020 09:17:36 AM

__________________


Guru

Status: Offline
Posts: 7314
Date:

Mamil wrote:
Whenarewethere wrote:

I'm using 6awg for my 120 watt setup, but I'm trying to get blood out of a stone!


Single 12V nominal panel at 120W? Only reason to go up in wire size is to reduce losses due to volt drop, .....


 https://thegreynomads.activeboard.com/t65231112/custom-6x20-watts-solar-setup-with-mppt/


__________________

Procrastination, mankind's greatest labour saving device!

50L custom fuel rack 6x20W 100/20mppt 4x26Ah gel 28L super insulated fridge TPMS 3 ARB compressors heatsink fan cooled 4L tank aftercooler Air/water OCD cleaning 4 stage car acoustic insulation.


Guru

Status: Offline
Posts: 5443
Date:

aussie_paul wrote:

How do people connect the suitable wire, like 6B&S, to controller? Also why are the controller screws flat rather than phillips?

Aussie Paul smile


 Hi Paul

Triuck  driver way of achieving this is to carefully drive the holes out.


__________________


Guru

Status: Offline
Posts: 4375
Date:

aussie_paul wrote:

 Also why are the controller screws flat rather than phillips?


 The screws should be brass, not steel. That means they are relatively soft and slotted heads will last longer than cross recess (Philips head) which are likely to be damaged when properly tightened.

Cheers,

Peter


__________________

OKA196, 4x4 'C' Class, DIY, self contained motorhome. 960W of solar, 400Ah of AGMs, 310L water, 280L fuel. https://www.oka4wd.com/forum/members-vehicles-public/569-oka196-xt-motorhome


Guru

Status: Offline
Posts: 5679
Date:

Radar wrote


 Hi Paul

Triuck  driver way of achieving this is to carefully drive the holes out.


 Hi Radar, do you mean increase the diameter by drilling with larger drill bit?

Aussie Paul.smile


__________________


Guru

Status: Offline
Posts: 7314
Date:

If drilling brass square up the cutting edge of the drill bit so it does not cut in as much as for steel.


__________________

Procrastination, mankind's greatest labour saving device!

50L custom fuel rack 6x20W 100/20mppt 4x26Ah gel 28L super insulated fridge TPMS 3 ARB compressors heatsink fan cooled 4L tank aftercooler Air/water OCD cleaning 4 stage car acoustic insulation.


Guru

Status: Offline
Posts: 5443
Date:

aussie_paul wrote:
Radar wrote


 Hi Paul

Triuck  driver way of achieving this is to carefully drive the holes out.


 Hi Radar, do you mean increase the diameter by drilling with larger drill bit?

Aussie Paul.smile


 Yes, that is what I the untrained would do and have done, make sure you remove the grub srew first.

Paul, I did think the reason the screw has a blade slot was because you use a screw driver with a protective coating on the shaft so you do not shorten it out.

There you go I can be dangerous.


__________________


Guru

Status: Offline
Posts: 1927
Date:

Radar wrote:
aussie_paul wrote:
Radar wrote


 Hi Paul

Triuck  driver way of achieving this is to carefully drive the holes out.


 Hi Radar, do you mean increase the diameter by drilling with larger drill bit?

Aussie Paul.smile


 Yes, that is what I the untrained would do and have done, make sure you remove the grub screw first.

Paul, I did think the reason the screw has a blade slot was because you use a screw driver with a protective coating on the shaft so you do not shorten it out.

There you go I can be dangerous.


 Hi smile 

My opinion would be, do not make things worse by drilling out the terminals. I did assume that Radar was just being smart arse but who knows. The terminal holes are not usually round but some bought in terminal block or a cast brass block, both types have a rectangle shaped hole for the metal parts usually in my experience. Easy enough to f*ck them without trying that hard furious  

Jaahn

PS I though Radar was confusing it with driving the flats off the tires by putting them on the drive axles !!


__________________


Senior Member

Status: Offline
Posts: 430
Date:

Jaahn wrote:
 

Hi Mamil smile

using 6mm2 wiring the volt drop would be 0.57V, whereas keeping everything else constant and upgrading to 16mm2 the volt drop would be reduced to 0.21V, which equates to a saving of only 3.6W or 3% of your max output." 

Well what you say is true, but the voltage loss of 0.36V actually can make quite a difference to the charging of a battery. However it is still a voltage drop which is a total loss and does no good at all so minimise it if possible. If the overall voltage dropped from 15 down to 12 this is 20% down but the battery charging stops and it is 100% lost.  Clean the panels too and arrange the panels in the best configeration only if you have a MPPT unit.  

Jaahn  


-- Edited by Jaahn on Sunday 28th of June 2020 09:17:36 AM


Hi Jaahn, I don't know where the figures of volt drop from 15V to 12V came from??, but given that the Vmp of a nominal 12V panel is around 18V then a volt drop of 0.57V as per calculated example above would still leave you with an input voltage to the controller of well over 17V, and as the maximum output voltage needed to properly charge a battery is 14.7V (or 15.8V if you include the need for an occasional equalisation charge), then in this case volt drop between the panel and controller is not a limiting factor for even a PWM controller. As for minimising losses, I'm all for that, but my point is simply that so long as the wiring size is adequate for the current and length of run (and in the example above I would suggest that 6mm2 meets this criteria, and even 4mm2 would do), then increasing the wire gauge beyond this gives minimal returns, and if the objective is to maximise overall system output then there are other ways of doing this that are sometimes cheaper and easier - the so-called 'low hanging fruit'.


-- Edited by Mamil on Sunday 28th of June 2020 05:12:03 PM

__________________


Guru

Status: Offline
Posts: 5679
Date:

Thanks for the input everyone.

It appears our Morning star ProStar 15m regulator has given up the ghost.cry

A pic of the 15 amps faulty one is the lower one, and a cheapy 30 amp. Hole sizes very different!! disbelief

Going to try a Morning star ProStar 30m as it will swap out without too much drama.


Aussie Paul. smile


Attachments
__________________


Guru

Status: Offline
Posts: 7314
Date:

I'm very happy with my Victron & you have data on the phone with Bluetooth models.

Whichever make you go for make sure they have stock in Australia as international mail is a disaster at best.


__________________

Procrastination, mankind's greatest labour saving device!

50L custom fuel rack 6x20W 100/20mppt 4x26Ah gel 28L super insulated fridge TPMS 3 ARB compressors heatsink fan cooled 4L tank aftercooler Air/water OCD cleaning 4 stage car acoustic insulation.


Guru

Status: Offline
Posts: 7640
Date:

I use an active termination link box . Then the wire to the controler as short as possible. Dont twist the wire if possible ? It makes the wire larger .

__________________
Whats out there
Page 1 of 1  sorted by
 
Quick Reply

Please log in to post quick replies.

Tweet this page Post to Digg Post to Del.icio.us
Purchase Grey Nomad bumper stickers Read our daily column, the Nomad News The Grey Nomad's Guidebook