I finally got around to installing my solar panels on the caravan.
I'd always had an idea of how I wanted to do it and got my chance to try it out.
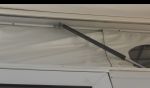
Since I have the pop top the center of the roof is a very light tin and is not capable of supporting the weight of the panels outright.
Luckily the outside of the roof frame is an aluminium and can support the frame work to support the panels
Underneath that frame leaves plenty of room for drilling through and bolting stuff to it
with that in mind, I wanted to create a roof rack style of frame which would add rigidity to the roof and provide support for the panels, all the while lifting them up a little to make sure they're not placing any weight on the centre of the roof and to allow some cooler air underneath for ventilation.
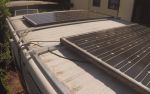
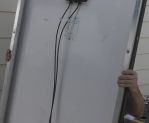
Bottom of the panels
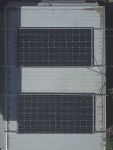
Frame on the roof
I was very wary of height here but am comfortable that I haven't added too much to the top of the van.
Whilst I cover off my concerns and thoughts through the video, the main impact I was concerned about was weight.
So I opted for 2 x 185w panels at 15kg each, rather than the 2 x 235w at 20kg a piece.
That said, I just finished putting on all new struts (video and post to come soon) I realised my current struts were dead and I could have gotten away with the 235s anyway.
Oh well, better to be safe I guess.
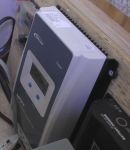
These are old house panels at around 40v and are set up in parallel and fed into my epever mppt 40A controller
This allows me some benefit when shaded and allows me to reduce the cable sizes for the runs down to the battery area.
I still have decent size cable though (using my previous lead for portable work) but I'll make up a more suitable length.
Currently, the cable is not permanently installed and will be plugged in and out as required.
I think I'll keep them running off Anderson poles though, to allow me to isolate or remove as required.
They'll also route through a circuit breaker soon enough.
Someone on here did offer advice as to how they ran permanent cabling on their pop top but I don't recall who.
If you read this please let me know and refresh my memory please :)
I have some ideas but nice to see it actually done, so I can make a judgement call on it.
So now my new 12v fridge is covered for power with 2 batteries and a good amount of solar. Sure I'd like some lithiums but $$$ Oh well, they'll come down in price soon enough.
As you can see below, I placed some separation between them to balance out the load on the roof, rather than sticking them up front or back.
This also allowed for me to keep the weight more toward the center of the van .
Thanks for reading and as always, here is the video
G'day Brett,
I think the person you are chasing is me.
I ran the cables down the side of the van in 50x25 conduit & then into the van through the floor into the power compartment under my bed. I did put pictures (at your request) on the forum but it's going to take me a while to search for them.
__________________
Warren
----------------
If you don't get it done today, there's always tomorrow!
all good mate. Now that I know who did it, I can go searching myself. Wouldn't ask you to do that.
Much thanks for letting me know. I'll go suss it out.
Advice from experience with the sealant D Mastic by Selleys Its does get fairly dry and eventually cracks . When older even a few years looses most of its abilities . However it retains slight adhesion and sealing qualities if undisturbed . Clamped between 2 surfaces is ideal 1-2mm gap . Examples of this are old school automotive heater boxes is an excellent use .
D mastic is not great for exposed movement prone joints . Besides its terrible to clean up .
A better and cheap product is SIKASIL named as Industrial but called RV silicon. Its designed to be used for van light construction and sealing . [ main frame construction use urethane = permanent fixing ] cost = 6$ from Bunnings order in. THEY might tell u uneed a box but that's B/S or Bradfast are the agents
Medium adhesion medium strength vibration resistant removable white black etc
-- Edited by swamp on Thursday 4th of April 2019 02:25:21 AM
The best adhesive seal by far for exterior use these days is Selleys Armourflex. It won't go powdery like Sikaflex, doesn't need anything more than a clean down with a metho to get it stick and to smooth off the finish, and is available at Bunnings.
T1 Terry
__________________
You can lead a head to knowledge but you can't make it think. One day I'll know it all, but till then, I'll keep learning.
Any links to any sites or products is not an endorsement by me or do I gain any financial reward for such links
hi Terry
Where the OP is placing the sealant it wants to be easily removeable. The Sikasil Industrial fits the bill exactly. The Armourflex i suspect is for more permanent join .
Thanks boys for the tips.
This is just what I had on hand at the time.
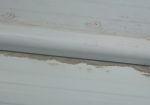
I've been away in it with some wet weather and am happy to confirm there are no leaks :)
As it progresses though, I may have cause to pop a few more holes up there, so will suss out the Sikasil . Thanks Swamp.
Terrry, Swamp is right, I don't really want to lock them down with an adhesive.
It might be handy on the end bolts though for the 'rails' . I figure they probably won't be going anywhere and are likely to be a permanent fixture.