I am about to embark on a project of installing another solar panel on top of our van. I am planning on gluing fiberglass pads to the roof, and not using any other form of fastening to attach the mounting feet to the roof. If anyone is interested, I will post up the process with pictures as the project progresses.
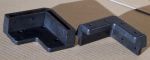
Well I have gone and purchase a 150w solar panel, 30 amp regulator and a set of plastic feet, all from the Jayco Toy Shop. I would have preferred feet that had more surface area, but I also liked these as they clamp down on the panel, but also the panel can easily be removed if required.
The reason I wanted more surface area for the feet was that I plan to only glue the feet onto the roof.
At this point in time I am waiting for the fiber glasss shop to make me up some pads which I will use to screw the feet onto, then Stikafex them to the roof.
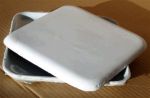
Progress has been slow, but I have had 5 pads made up of fiberglass, I brought some cheap dishes from the Big W for $2 each, to use as molds. Have brought stainless screws and nuts 4mm x 16 long, with the nut fitted into a counter bored recess, the plastic mount fits the pad quite nicely. Next step is to drill and counter bore all of the pads, The fifth pad is to be cut in half and have the center mounts fitted to them. I'll fasten the pads to the roof of the van using Sikaflex 232, no screws into the roof of the van.
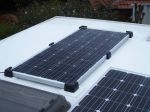
Had some time over the long weekend, and the temperature was lower. Washed the area where the pads were to be stuck down with detergent and then acetone. I used Sikaflex 252 as recommended on their site. $32 bucks a tube, comes in what looks like an aluminum tube, and is quite hard to apply. All went well though and the pads are firmly stuck down on the roof, no screws, no holes. With this style of attaching bracket, the solar panel is removable, which down the track may be handy.
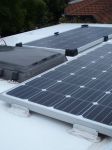
Gosh, I didn't measure, can do if you want, but the clearance was what was built into the mounting feet, plus that of the fiberglass pads, which were about 10mm thick. I have only just connected the panel up two days ago, as I had to re-do the electrics about the battery installation. Part of connecting up the panel, and a diesel heater. I think the air gap would be about 25mm, not as great as the two Jayco installed panels. No screws or rivets have been used between the pads or the roof, I screwed the feet to the pads using the holes provided.
Yea was wondering as im about to fit two small panels on my roof.
Ive opted for angle ally and have yet to decide on what size gap for cooling of panels.
Ive read 20 to 50 mill is the norm.
Thanks for the reply.
Kezngaz.
__________________
Commitment shows. Quality is what is done when no one is looking.
FYI the panel to the bottom of the mounting bracket 10mm, the clearance of the mounting bracket plus the fiberglass pad 20mm, the clearance of the Jayco installed panels 35mm.
Had some time over the long weekend, and the temperature was lower. Washed the area where the pads were to be stuck down with detergent and then acetone. I used Sikaflex 252 as recommended on their site. $32 bucks a tube, comes in what looks like an aluminum tube, and is quite hard to apply. All went well though and the pads are firmly stuck down on the roof, no screws, no holes. With this style of attaching bracket, the solar panel is removable, which down the track may be handy.
I've been scratching my head trying work out how you remove the panel once mounted, it looks to be trapped from both sideways and end movement even if the screws are removed......... or are the mounts a 2 part thing where the outer section comes away from the mounting foot?
T1 Terry
Ummm....... The photos on a previous post didn't appear before I made this post, I can now see the mounts are a 2 part thing, what a great idea, well done and thanks for sharing.
-- Edited by T1 Terry on Thursday 8th of June 2017 11:57:24 AM
__________________
You can lead a head to knowledge but you can't make it think. One day I'll know it all, but till then, I'll keep learning.
Any links to any sites or products is not an endorsement by me or do I gain any financial reward for such links
Hi Terry, yes the panel I installed is removable, each mount is in two halves, sliding into each other. The side screws lock the mount together, and the top screws are to clamp the panel down to stop movement. What happened, I just went to Jayco shop and asked for one panel to match what I had already and mounts, that's what I got. I had been toying with the idea of making the panel removable and turning it into a portable panel, if I was going to stay at one place for a while during winter when sun hours are minimal, with the panel tilted, I could get more power to the batteries, while in the summer months mounted flat on the roof would be OK. So using the mounts leaves my options open.
I have a fiberglass roof and intended to glue the mounts on the roof, no screws or rivets, but the mounts supplied, I felt did not have the surface area that I was satisfied with, hence the pads. There are white mounts on the market which look as though they have a greater foot print, and may be ok to glue direct, and if the panels are to be mounted permanently, the aluminium angle is the go.
So I have screwed the supplied mounts down to fiberglass pads (to give more surface area for gluing), the pads a Sika flexed to the roof. 20 screws and the panel comes off.