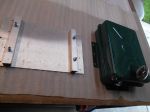
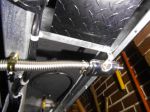
I thought I would share the installation of our Planner Diesel heater with some Photos of our baby growing by the day. I had only one little hiccup, that been the length of the bolt threads not been long enough. So I used a 6mm chisel to remove a small amount of ply around each of the threads.
I asked on here about the placement of the fuel tank. After lots and lots of thought.
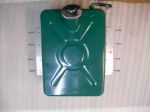
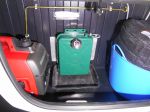
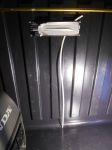
I decided to put it in the boot next to the genie. I tried a small 1mm test hole in the back wall to see if there were a ply sheeting behind the black moulding.
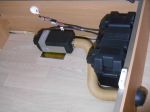
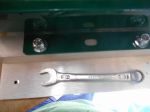
All the parts. Lay them out, Read, and Read again, to identify all. there are parts that will not apply, as they are used for primarily for the trucking industry in Europe. The main one being an extention cord/ wire for the longer run on a truck. ALL the wires have Male / Female connections.(simple) I also brought the muffler. I turned the house battery side ways to clear the frames below. Again here I used a 1mm test hole and placed a LED torch over the hole from the inside, The beam lights up the tiny hole. This is why I move the battery. Good move. The test hole ,allowed me to measure from the inside where to use my hole saw. Using the backing plate as the template as a guide. the rest was like a Meccano set.
I have attached a few Photos.
PS: I raised the fuel tank 50mm up the wall to allow a small cat litter tray to sit under neigth while filling the tank and catch any over fill/ spill.
Jim
-- Edited by Hey Jim on Monday 9th of May 2016 09:05:26 PM
-- Edited by Hey Jim on Tuesday 10th of May 2016 03:27:33 PM
We have just bought a heater and it comes on Wednesday. Got a quote to put in but wondered looking at your pictures, if my hubby thinks he might be able to do this, can I ask you more questions. He is a carpenter so should be okay
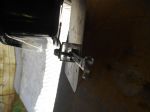
Yes he can, If I can anyone can, with a bit of time. I did mine in the cave with a garage creaper for my back. From A-Z Total 6 hours for me Including reading over a few times I use a Hilight pen to highlight the parts. PM me any time. I will post a few more side view Ph of the mount to show how I attached the tube to the Aluminium old sign I got off the council cleanup.
A couple of 50mm holes cut through the bed base to let the heater breathe and recirculate the heated/cabin air would not hurt. These little heaters do not like being restricted on the intake side, it cuts their performance .Maybe you have done this and is not in the pic.. I reckon these heaters one of the best things you can equip a van with.
A couple of 50mm holes cut through the bed base to let the heater breathe and recirculate the heated/cabin air would not hurt. These little heaters do not like being restricted on the intake side, it cuts their performance .Maybe you have done this and is not in the pic.. I reckon these heaters one of the best things you can equip a van with.
KB
Not really necessary, no bed base is airtight, there is heaps of 'breathing' space there.
If mounted in a small cupboard (as I did) then yes, I fitted a large breather hole to that.
__________________
Neil & Lynne
Pinjarra
Western Australia
MY23.5 Ford Wildtrak V6 Dual Cab / 22 Silverline 22.68.5
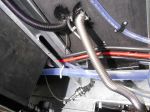
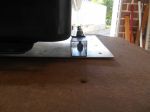
No. The pictures make it look close. But no I think the holes in the floor around the exaust would go first.
Jim
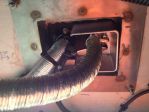
Hey Jim I think you should have a bit more clearance between the exhaust and timber floor. When I fitted mine I had to go through 40mm styrofoam. I had 2 layers of 1mm stainless steel sheeting with an air gap between the two and then the final mild steel shroud as per the photo below. You can seewhere the other layer of stainless steel was tacked on. Some of the more expensive units have a shroud built into the bottom of the unit.
We have just bought a heater and it comes on Wednesday. Got a quote to put in but wondered looking at your pictures, if my hubby thinks he might be able to do this, can I ask you more questions. He is a carpenter so should be okay
well done Jim, looks like you have a Jayco too! Let us know how effective it is.
cheers steve
Our Van is a similar design Jayco PopTop with single beds and I installed the exact same heater and also have put the tank in the boot.
To answer your question they are the best heating we have ever had in a van and once you get familiar with the setting that suits you they are real easy to use and very economical on fuel.
And if you get one of these then fueling it and the genny is a breeze.
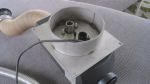
Hi. Can I get some ideas please folks, how you all 'neatly' cut out the outlet vent hole through the ply bed base. I can imagine it could splinter very easily.
Thanks, John
__________________
"My mind is made up. Please don't confuse me with facts."
Well done Jim....I always love seeing so many empty spaces and everything in its place...neat and tidy.....BEFORE the trip starts.....my experience is Vans tend to become 'The Wreck of the Hesparus' after about the eighth day on the road.....now where's the bloody TV remote....?....and where are my Ugg boots.....?.and you know you're in strife when the question of what's been worn or dirty is determined by ones nose/sniff test......how come I can only ever find the used underpants.....and you convince yourself no-one gets close enough at Happy Hour to smell you........and who smeared this brown stuff on the floor..and what is it......? lmao!........all the breast....er best mate.....Hoo Roo
__________________
'The secret of happiness is not in seeking more, but in developing the capacity to enjoy less'.Socrates BC399.
'Be a Cheerful Nomad, not a Grumpy Gromad, it's the Surly Bird who catches the Germ'!
Hi. Can I get some ideas please folks, how you all 'neatly' cut out the outlet vent hole through the ply bed base. I can imagine it could splinter very easily. Thanks, John
Use a Hole Saw but cut from both sides...eg cut 1/2 way through then using the pilot hole come in from other side, no splinters then.
__________________
Neil & Lynne
Pinjarra
Western Australia
MY23.5 Ford Wildtrak V6 Dual Cab / 22 Silverline 22.68.5
Make sure that the exhaust especially ALWAYS goes down hill from the heater, no dips and rises back up at any point as any condensation will collect in the dips which in turn will limit or even stop the heater operating.
The muffler should also be mounted so the connections are higher than the other side so the condensation can run out the little drain hole in the edge. Some of the mufflers don't have a drain hole which might also be something to watch down the track.
If you live in an area with mudwasps you may also need to fit stainless gauze of the outlet to stop the little buggers blocking the pipe, this can also apply to the inlet if no aircleaner/silencer is fitted.
AHA...I see Jayco has fixed a s**t of a fault we had with ours. The ally frame around the bed base for the bedframe. Ours was timber...and the stupidly small screws that jayco used just ripped out...so I got hold of some 5mm bolts and nylock nuts and enough washers and BOLTED the damn thing in!!!
Is as solid as a rock now...and on the odd occasion the bed base gets accidently dropped...there is no more damage.
Great picks on Install Jim. We aint gunna do this with our current Jayco tho.
Cheers Keith
-- Edited by ST391GQ on Tuesday 10th of May 2016 06:52:44 PM
I installed a planner in our Coromal - the only extra thing I did was make up a 3 sided cover for under the floor to cover the outlets (front and 2 sides and bottom) from water/rain while driving. It was the best upgrade ever. We had it going last week up at Sandy Cape (WA).
__________________
Glen
A diesel Nissan Pathfinder towing a Coromal Element 542.
Hey Jim, I can't quite make out in your pics, where is your heater fuel filter? Pretty sure my Belief instructions said to install it above the fuel tank.
Is that the $140 odd fuel tank? I used a 5L jerry can, heaps cheaper & I had the fuel line long enough that I could lift the tank out of the boot to refill, no spillage inside boot.
Very neat job you have done, congrats.
__________________
Neil & Lynne
Pinjarra
Western Australia
MY23.5 Ford Wildtrak V6 Dual Cab / 22 Silverline 22.68.5
Hey Jim, I can't quite make out in your pics, where is your heater fuel filter? Pretty sure my Belief instructions said to install it above the fuel tank.
Is that the $140 odd fuel tank? I used a 5L jerry can, heaps cheaper & I had the fuel line long enough that I could lift the tank out of the boot to refill, no spillage inside boot.
Very neat job you have done, congrats.
Hi Neil, the fuel filter is mounted in the vertical position before the fuel pump on the inside of the chassis out of harms way. I got the heater & tank together on flea bay from Pinnical in VIC =$880.00 plus the Muffler $45 T/C =$925 delivered. Do you want A photo of mounting. According to the instructions It takes 45 seconds to prime up from the tank and fire up.
I will test it out when I get a chance to pull it out of the cave. I'm working flat out with hand over at the moment. Two weeks to go.


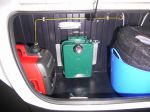
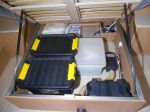


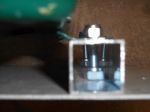


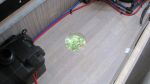
 I mean the boxes are hiding the second air vent with the toggle arms to help the brew.


