check out the new remote control Jockey Wheel SmartBar Topargee products Red Earth Festival Park Booker Mackay Festival of Arts
Members Login
Username 
 
Password 
    Remember Me  
Post Info TOPIC: Refitting a Dometic Awning and roller.


Veteran Member

Status: Offline
Posts: 27
Date:
Refitting a Dometic Awning and roller.


Hi.  I hope I'm not opening a thread that has been covered before, but I've looked without success.  I apologise if I have. I have bought a Dometic replacement awning, complete with roller. It is pre-tensioned.

Does the pretension exist at the deployed status (ie. Fully rolled out and ready to re-wind back to the RV)?  I'm checking as there are no instructions I can find for the refitting of the complete unit, only instructions for the replacement of the awning fabric. There are Dometic instructions in PDF or some such.  To my limited imagination, it seems all I have to do is thread the RV end of the awning into the receiver on the top of the roof, unroll the awning and refit the end struts. Am I being overly simplistic?  aww


__________________


Guru

Status: Offline
Posts: 1241
Date:

The Carefree awnings also come pretensioned on the roller as does yours and is fitted to the sail track wound up and installed onto the arms in the closed  position. That is to say the pretensioning is only sufficient to ensure the awning retracts fully when packing it up. I would think the Dometic awning would be done the same way. Pretensioning to allow fitting in the unrolled state would be dangerously high.

Alan


__________________


Guru

Status: Offline
Posts: 848
Date:

I helped a guy fit a replacement awning at a caravan repair place, and it was pretensioned rolled up. We set up a tressle plank so we could feed along the sail track without streching and just unrolled enough material to feed the edge through the sail track, some vasaline at the beginning in the sail track also helps. Once on the sail track, manually roll on the excess material but leave enough out so you can position the roll onto the brackets at each end.  Once in the bracket securely and in the closed position there's a pin that needs to be removed (pulled out) to release the spring.  It's pretty easy really, but setting up a tressle is the key to make a difficult job easy.

Hope this helps

Regards Steve.


__________________

Steve, Di & Ziggy We named our Motorhome "Roadworx" because on the road works "On The Road Again"
Ford Transit with 302 Windsor V8 conversion, C4 Auto, 9 Inch Ford Diff All Lighting L.E.D., 260 Amp/h AGM, 530 Watt Solar + Kipor Backup Gen.


Veteran Member

Status: Offline
Posts: 27
Date:

Ok. Thanks very much Brenda and Alan, Steve,Di and Ziggy. I suppose I was about a quarter correct.... That makes sense about the dangerous tensions having let the old one unwind using an angle grinder. heheh. The trestle idea is a great one and I have just the thing here. I shall be doing it pretty much on my own I reckon but I am accustomed to making Heath Robinson contraptions to get me by. The old one slipped out quite easily so I'm in front there.

__________________


Guru

Status: Offline
Posts: 848
Date:

Hi Rock,

Get a mate to help you, because it's a 2 person job, with it on the roll you can't feed into the sail track and be holding the other end level unless you've got 4 arms an then two of them need to be bloody long.  Only unroll it off the roll to get it on to the sail track & the roll into the bracket, because the material has the right tension on the roll as is already straight.

The guy I helped his offsider was off that day and he needed a hand so I volunteered, cause I wanted to know how to do it. Having seen it done first hand I wouldn't attempt doing it on my own, as I said it's a 2 person job and with 2 takes less than 10 minutes.

Regards Steve.


-- Edited by madaboutled on Sunday 5th of April 2015 02:57:28 PM

__________________

Steve, Di & Ziggy We named our Motorhome "Roadworx" because on the road works "On The Road Again"
Ford Transit with 302 Windsor V8 conversion, C4 Auto, 9 Inch Ford Diff All Lighting L.E.D., 260 Amp/h AGM, 530 Watt Solar + Kipor Backup Gen.


Veteran Member

Status: Offline
Posts: 27
Date:

Ok. Thanks Steve.

__________________


Senior Member

Status: Offline
Posts: 120
Date:

Try this https://www.google.com.au/?gws_rd=ssl#q=dometic+awning+installation

Download installation manuals,  A quick how-to video on setting up a Dometic brand awning


__________________
TommyG


Veteran Member

Status: Offline
Posts: 27
Date:

Well, my neighbour is away. The closest mates are a couple of hours away and my partner is an incomplete paraplegic.  Sooo, I did it on my own today. Spent more time looking, thinking, ensuring it wouldn't fall on me. All up, about an hour or so going real easy.  smile  Roped one end to the van roof once threaded.  Dismantled the other end brackets, bolted both ends and reassembled the bracket. Easy peasy.
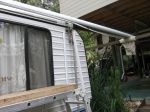
  awwIMG_0068.JPG


Attachments
__________________


Guru

Status: Offline
Posts: 6219
Date:

Good for you Ric, well done.

Aussie Paul. smile


__________________


Veteran Member

Status: Offline
Posts: 27
Date:

Thanks Paul. I was raised on a farm. "Needs must and the devil drives". Most things in life are hardly a challenge, really.

__________________
Page 1 of 1  sorted by
 
Quick Reply

Please log in to post quick replies.

Tweet this page Post to Digg Post to Del.icio.us
Purchase Grey Nomad bumper stickers Read our daily column, the Nomad News The Grey Nomad's Guidebook