The fresh water tanks on my Traveller caravan are mounted transversly, one between the dual axles and one just forward of them to minimize changes to the centre of gravity between empty and full. Great. Except that the drain valves are inside the chassis rails and can only be reached by laying on my back on the ground and wriggling/squirming in underneath. If I'm cleaning the tanks this 'excercise' must be repeated at least 6 times (drain, cleaner chemicals, rinse, then fill before the next trip).
It WOULD be nice if the drain taps could be brought out somewhere convenient on the side of the chassis. And it turns out that on this chassis there is an ideal position where the drawbar (A-frame) ends just ahead of the wheels and the chassis profile 'steps up'. Except that that position is occupied by the grey water drain and a handbrake cable. Damn. Time to think outside the box.
I can easily fabricate a simple bracket to share existing screw holes from the grey water drain saddle clamp and drill another into the low stress floor support at the front of the wheel space. And I can make the inner side of the bracket big enough to bend up into a brake cable guard. And by mounting the drain taps underneath the new bracket shelf it will all fit without interference. Yay.
I needed to replace the existing taps with 20mm screw-in poly pipe 'tails' and heat bend the poly pipes into tighter that their kink radius; just support them while heating and cooling with something flexible inside. Suitable poly pipe taps, some pipe clips and cable ties finish the job.
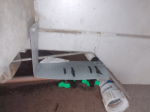
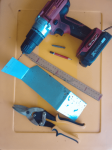
Picture 1 - Bracket and tools to make it. 365 x 80mm, 45° bend at 95mm, narrowed end 50mm with 90° bend at 105mm. YMMV
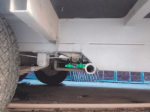
Picture 2 - Bracket bent and fitted, 3 screws
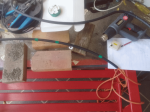
Picture 3 - Heat bending poly pipe. A hair drier can barely heat enough, but a cheap heat gun does this easily. Heavy electrical cable inside prevents kinking
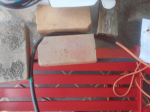
Picture 4 - Simple jig to hold shape while poly pipe is cooling (3 bricks)
Picture 5 - Finished poly pipe bends, cable ties will straighten the long curve
Picture 6 - Test fitting to detirmine where to drill holes for cable ties
Picture 7 - Top view showing cable ties
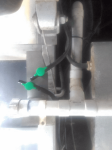
Picture 8 - Side view pipe and taps all locked in place with cable ties
This was so easy. All done in less than an hour. My only regret is that the factory hadn't done it in the first place.
Good point Bruce. But the taps may need protection. My taps at the end of the tanks (3) need protection, one behind the wheels has a chip out of the spout.
I have extended the 4 inch chassis in our 21'6" Traveller, from ending infront of the wheels to the rear jacks, so there is 8inchs above the wheels ( yours 6 +2)