Last week I had the caravan axle underslung to increase its height to stop it dragging on my driveway. Combined with the pajero lift (2inch) not for this purpose though and the adjustable tow hitch, I'm now able to get in and out without issue. I thought it might help someone looking at their options if in the same situation. It will be a few weeks before I head out for a trip away, so the information in the video is more around the lift itself and some initial impressions. I did plenty of research on this site and other before making the decision.
I read plenty of posts on the topic but paid most attention to those who had actually done the change and looked to their experiences to help guide me. Happy to accept constructive feedback and discussion but don't want this to turn into a brawl .
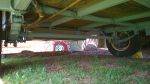
Anyway, here is the video of the results and where I'm at in my head with the change thus far.
I'll report back as I have a chance to properly test it out.
I have a similar problem in getting in and out of our driveway crossing. I don't have the option of raising the van though because of limited doorway opening height in the shed. I think my van is even lower than yours before the axle flip.
Looking at the video, I think that the centre bolts of the spring seem to not be locating on the axle. These bolts are to locate the spring and to stop the axle moving back & forwards or even sideways should the U bolts come slightly loose (and they do). The centre bolts appear to be poking out through the bottom plate. As originally mounted, there is a small plate with a locating hole in its centre welded to the axle. The head of the centre bolt locates in this hole. I think that plate is there on your axle, but cannot be 100% sure - the axle seems to be bolted directly against the top leaf of the spring. If the locating plate is there, maybe the centre bolt is not located in the hole correctly.
I would measure the toe-in or toe-out of your wheels. I had a hell of a fight with Jayco about this because I had 10 mm toe-out as originally delivered. The tyres wore out in less than 18000 km. Jayco simply didn't check toe-in at assembly. (they didn't do a lot of quality control at assembly). They passed the buck onto AL-KO, the axle manufacturer. Eventually, AL-KO came to the party and replaced the axle for me free of charge, but even the new axle has 5 mm toe-in. I suspect that the toe-in (or out) comes from the method of manufacture. They have a round stub axle which has to be welded onto a square axle. They must have a jig which holds the axle fairly well aligned and then they weld one side. The weld shrinks. The axle would lose its alignment. They then weld the other side and the axle pulls back, but not all the way. AL-KO told me that toe-in was necessary to ensure stability when towing - to stop it wandering. I reckon it is simply that they cannot control the process any more accurately.
Jayco also assembled my axle 20 mm offset - the U bolts on the left side have hit and bent the chassis rail. Heaps of clearance on the right side. The dent in the chassis rail is right at the point of maximum stress loading, but so far, no extra chassis deflection has occurred, so I assume it is OK for where I travel.
I have worn out 4 sets of tyres since the year 2000. Each time, I have been assured that the problem has been corrected, and finally AL-KO gave me a new axle. Thusfar, the tyres seem to be wearing reasonably evenly, although as the tread wears down, I expect that they will start scrubbing unevenly again.
I suspect that your mechanic rotated the axle horizontally (left to right) as well as vertically (to avoid having to re-weld the locating plates). If this is the case, you should have the plates and the axle in their original alignment and the toe-in should be the same as when it left the factory. It is simple enough to check - get someone to hold a measuring tape on one wheel and measure the width at the shoulder of the tread front and back. The difference in measurement is the tow-in or toe-out. Hopefully you will have a slight toe-in. If you have toe-out, expect to wear the tyres on the inner shoulders in coming years.
Long-winded, I know, but I am hyper sensitive to this problem and when I am in a caravan park, I look at other people's tyres. I have found 8 people with very worn tyres and the owners were not aware of any wear problems at all. Reviewing this post, it seems as if I am having a go at Jayco for their lack of quality control. I guess that I am, but talking with other van owners, I suspect that Jayco are really no worse that any other major manufacturer in this respect. They are all bad...
-- Edited by erad on Monday 15th of January 2018 11:19:11 PM
Thanks for the input Erad.
I shall take your post out under the van on a tablet so I can read it and view the specifics of what you are referring to.
I was thinking I could check the reversing of the axle left to right by just checking the tires from the video to where they are now. Unfortunately, they could have left the tyres in place but still switched the axle as they also did the bearings too whilst they were there.
They did advise part way through the process when I checked that they were in the process of welding on the new locator plates to the axle as part of the process.
I can confirm, at least to the best of my knowledge and recall that the mounting plate did have the 'stub' coming through it as a locator in its original state.
I shall also keep a close eye on the wear of the tyres.
thanks again.
If they welded the locater plates onto the axle, then they simply flipped it over. They would also have had to dismantle and reassemble the brakes because the levers would be facing backwards - no problems here. They would do the wheel bearings at the same time then. What you once had as toe-in is now toe-out, so I would check the toe-in or whatever and verify that it is not toe-out. Hopefully it should be zero, or near to that.
Flipping the axle is the best way to do this job, because hopefully Jayco originally set the plates in position and lined up the axle correctly. When I installed my new AL-KO axle, I had to realign the axle to ensure that it was central and also that the van was tracking straight and then weld the plates to the new axle. If they rotated left to right, the axle could easily be offset. At least this way it is as Jayco originally set it up, (even if that was wrong).
Regarding the centre bolt in the springs, I don't recall seeing mine protrude out through the base plate.
I would also check the tightness of the U bolts after doing a trip somewhere. They tend to settle in after being disturbed.
I noticed that you have slipper springs on your van. Are you aware that the only thing holding the axle in place on each side is the front shackle bolt. I am not a big fan of these.
With all due respect, if possible I would suggest changing the springs to ones with shackles at both ends. Yes more expense.
At the very least check the bolt that is there now. If it has never been changed then replace it with a new one. One with a grease nipple.
Baz, Understand what you're saying. I do plan on puting new springs under it at some point. so may as well do as you suggest. Whilst I have not seen them in the format you mention, any additional security can only be a good thing
Good point Erad on checking the ubolts. Probably something I would have thought of down the track but I must admit I hadn't thought of it yet.
denmonkey, sorry for the confusion, I reread my answer and was not impressed so will reply again.
Change from slipper springs to springs with an eye at each end of the main leaf. The eye at one end will fit into the spring hanger already there at the front, fixed with a shackle bolt. At the rear, weld another spring hanger to the chassis rail.
Fix the other eye at the other end of the leaf to this hanger by using two shackle plates and two shackle bolts.
Hi denmonkey, I am looking at doing the same mod for light off road and a little more drive clearance. Just wondering if you checked for any engineering / insurance issues with this kind of modification, ie destabilisation / roll / brakes?
Cheers Vince
__________________
"life is too short to spend it with people who suck the happiness out of you"
Your van was underslung to start with and is still underslung after the mod.
The "slung" refers to where the leaves are in relation to the axel. From the factory the leaves are slung "under" the axel, and they still are. If you mount the axel under the leaves the axel becomes "overslung". Overslung is never recommended because and in the event of a broken U-bolt or leaf collapse, major damaging events will take place as the entire axel and caravan part company.
What you had done was this. The "overlay" axel was rotated to be an "underlay" axel.
Overlay axels were used in the past to make the trailer/van sit lower to the road. This was back when we all towed with the family sedan or stationwagon and nobody except the rich had a high clearance 4x4. To make an overlay axel, a stub axel is welded onto the top of an axel beam. This lowers the trailer/van by approx. 2 inches for a 50mm beam/stub.
If you rotate your overlay axel to become an underlay axel, you raise your van height by approx. 4 inches for a 50mm beam/stub.
The process is as simple as removing the wheels and complete drum brake assembly (bearings and 4 backing plate bolts), unbolting the u-bolts that hold the leaves and beam together, rotating the beam and reassembling everything. Overlay axels using slipper leaves have no need for shaping of the beam for camber as the beam/s must be rated well in excess of the loaded mass of the van. The workshop would have checked that the beam should be perfectly straight.
As you have shocks, then a pair of new hangers are welded onto what was once the front but is now rear side of the beam.
The extra bounce you experienced is how it really should fell ALL the time. Rotating the axel would not have altered the dynamics of the van. The workshop would have probably replaced and greased your front leaf bushes, rear slipper hanger and oiled the leaves. Something you should be doing every 10,000 km or more often if you drive on the dirt.
I have a Jacyo Westport just like yours and did the rotate thing a year ago for the same reason as you. Kept draggin the @rse over every driveway and speed hump.
Word of recommendation. Replace the U-bolts and centre leaf bolt with new ones every time you disassemble the axels and always carry a couple of justins in your box of bits (Justin case).
I broke a centre leaf bolt, which allowed the leaves to slide, which in turn broke one U-bolt and bent the other one, 50km out from Chilli Beach up Cape York this year, and had to unhitch on the side of the dirt road and do a 550km round trip into Weipa to get $10 worth of replacements from the awesomely stocked and knowledgeable bloke at Rebel Auto.
U-bolts = 4 x $8 each and center bolts = 2 x $2 each. Total = $36.
I would also recommend you get a sheet of tin and bend it unto a us shaped protector tray for your water tank.
Hope you love your van as much as I do mine. We've done a couple of laps in our and the light weight means you can take them anywhere on any road if you just drive to the conditions.
looking forward to next weekend for its first outting since the work was done.
As said, it was pretty empty, so now with water and usual gear, it should settle down a little.
I actually get out more in the cooler months and winter in particular because I like to avoid the crowds.
Nothing better than a camp site all to yourself.
It will also be my first outing with the new (to me) pajero after using a delica. Should be a much more enjoyable experience.