i have a Denning Landseer which I am in the throes of doing a conversion on, hopefully to make it into a functional and comfortable home on wheels away from home.
i am sure there are plenty of people out there that are doing or have done similar projects or upgrades to existing vehicles. My intention in starting this post, is to make contact with you and to share information, ideas or more importantly, share the mis-cues or disasters that could be avoidable for those of us still taking bites out of our project elephants.
By way of kicking things off; my Landseer has had its roof raised by 400mm to allow me to remove the sunken centre aisle and flatten the floor and still have good head room Clearance.
I have mounted 9 solar panels on the roof, 8 of these will feed power to re-charge a largish 24volt x 800 a/hour LifeP04 battery bank which in turn feeds power to a Victron 5 Kva inverter to run the house. All of my major appliances run on 240v.
The 9th panel supplies a second LifeP04 battery at 12 volts which in turn provides power for the LED lighting system and the 12 volt water pumps etc.
i have two fresh water tanks mounted roughly in the middle of the vehicle for a total of 1100 let's, a grey water tank that will hold 400 ltrs of water and a black water tank of 330 Ltrs of black water from the vacuum toilet. I can dump the grey water direct, when appropriate, or pump it through as a flushing option for the black water when at a dump point.
I am mindful that I may we'll be boring you with details of my project for those who read this, so I will cut it short here and hope to hear from like minded vehicle owners.
I for one will be interested in following your conversion progress. Many moons ago when one of my hats was doing cabinet making/carpentry I converted an ex Perth MTT Leyland Cub, which we lived in for a few of years.
Half way through doing my conversion I was approached by a friend who wanted to convert an ex Grey Hound coach similar to yours. Anyway, after doing my bus, I ended up doing the cabinetry on his coach and then 4 other bus/coaches over the next few years. Also fitted in a few bus and caravan repairs/mods along the way.
My friends coach had the sunken aisle like yours and he too opted for raising the roof, but instead of taking out the sunken aisle, we leveled it and mounted caravan type water tanks to take up the space. That way he had more space in the belly lockers for his "toys".
If you haven't started the interior yet, then the best advice I can give you is to get hold of as many large refridgerator cardboard boxes that you can, they make great templates for getting the shape of the walls. If you think that once you have one done you could reuse it 600mm further along.... forget it... the shaped changes. In the absence of cardboard, 5mm thick Corflute sheets are good too, although no as easy as cardboard to cut. 3mm corflute is bit to flexible, but OK for small templates.
Regards Steve.
__________________
Steve, Di & Ziggy We named our Motorhome "Roadworx" because on the road works "On The Road Again" Ford Transit with 302 Windsor V8 conversion, C4 Auto, 9 Inch Ford Diff All Lighting L.E.D., 260 Amp/h AGM, 530 Watt Solar + Kipor Backup Gen.
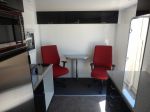
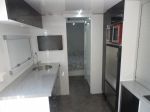
You are interested on the inside; so my build, which I hope may help you; has all come from IKEA.
That is all cupboards, lift up bed, benches, robes, pantry, stove top, oven, vanity etc. These all come with hinges, mounting brackets and soft close mechanisms.
The fantastic thing is that you can remove the backs/tops etc to save weight; plus shape the sides to suit your walls and or areas you are building.
I even used their coversheets for all my internal walls, including using them for the 2 x sliding doors I have to seperate the bedroom from the unsuite (middle of van) and the lounge/kitchen.
Happy to assist if needed with more info, and or photo`s of my build.
Regards.
Hetho.
-- Edited by Hetho on Sunday 14th of May 2017 06:01:04 PM